
jm-


Composing a Dance Track using a MIDI Sequencer

This workshop is mainly an introduction to the capabilities of MIDI sequencers, and how they can be used to create professional-

Virtual Tablet


Musical excerpts for use with this workshop can be accessed on YouTube by clicking 1. above for the workshop examples and 2. for the completed track (Latin Dance). Individual examples can also accessed throughout the workshop by clicking on the YouTube links when prompted.
1. Workshop examples
2. Latin Dance

The main sections in this workshop are listed below. You can read them in order or click on a link to jump to a particular section. See also National 5 Music Technology on the Resources page.

What is a MIDI Sequencer?
MIDI is an abbreviation of Musical Instrument Digital Interface.
A MIDI sequencer (not to be confused with musical sequence, which is a technique), is a computer programme which allows musicians to compose, record and play multi-
You can move, cut & paste, duplicate and combine these sound samples anywhere in a track (similar to the way words are manipulated on a word processor), and edit them by changing their pitch or adding effects such as reverb, chorus, delay and so on. Most sequencers also have the facility to record live instruments (including voice) whose music can then be edited (if necessary) and inserted into a multi-
Popular sequencers include Garage Band, Magix Music Maker, Pro Tools, FL Studio, Sibelius, Finale and Cakewalk, but there are many others, ranging from basic programmes to those used by professionals in the music recording industry -
More expensive sequencers have a lot of functions which allow you to do some amazing things, but you won’t have to learn all of them before using the sequencer – understanding just a few basics will get you started on your first piece of music and the other stuff can be learnt along the way.
Think of a sequencer as a musical jigsaw puzzle creator, where the sequencer is a large table and the sound samples are the individual pieces which can be arranged on the table to create any number of different jigsaws! In this case the ‘jigsaws’ are complete pieces of music.
Advantages of Using a Sequencer
Eight tremendous features of sequencers are…
1. They allow musicians of all standards, even complete beginners, to create impressive music thanks to pre-
2. You can input music at any speed, either in real time using a MIDI keyboard or by entering notes one-
3. Several different musical parts or tracks can be played back simultaneously (for example, melody, chords, bass etc), enabling you to check that everything sounds good when played together.
4. An intricate multi-
5. It’s easy to edit music, skip back and forth between sections and play back at different speeds in order to choose the most effective tempo.
6. A section of music can be played back as often as you like, or as a constant loop, to allow ideas to come into your mind concerning what to add next, or to experiment with different samples until you find one that fits with everything else.
7. In addition to helping you compose the music, sequencers allow you to hear what a piece of music written for live performance (such as an orchestral score) will sound like when played by live musicians.
8. An entire piece of music and its individual parts can be printed at the touch of a button for use by a conductor and any number of performers.
Taking advantage of this music technology, and using your own imagination, you will discover how easily an impressive piece of music can be produced, even if you don't yet understand music notation.
Right, now that you know all the good stuff sequencers can do, let’s see how they work…

When you first see a sequencer on a computer monitor it might look really complex and difficult to use, but don’t worry, it’s not quite as challenging as it appears. Many of the controls are very straightforward, some of which you will find on other types of audio equipment. Those functions which require a little more time to get the hang of can be learned gradually, since you only need to know a few basics to get started on your first piece of music. Remember, the technology is there to help you create professional sounding results more easily, not to intimidate you! With a little practise you will be making great music in no time.
The diagram below shows how a sequencer typically displays information on a monitor. Sequencers vary in appearance but their basic operating method does not, and you will find these general functions (and others) on all sequencers, even though the icons and their location differ. What you see below is a 'screen shot' representation of the first 14 bars of ‘Latin Dance’, the track I composed especially for this workshop. You can hear the full track on the CD which accompanies the book, How to Pass National 5 Music (track 35), and on YouTube (see link above). The numbered sequencer functions are explained below.

The Sequencer Explained
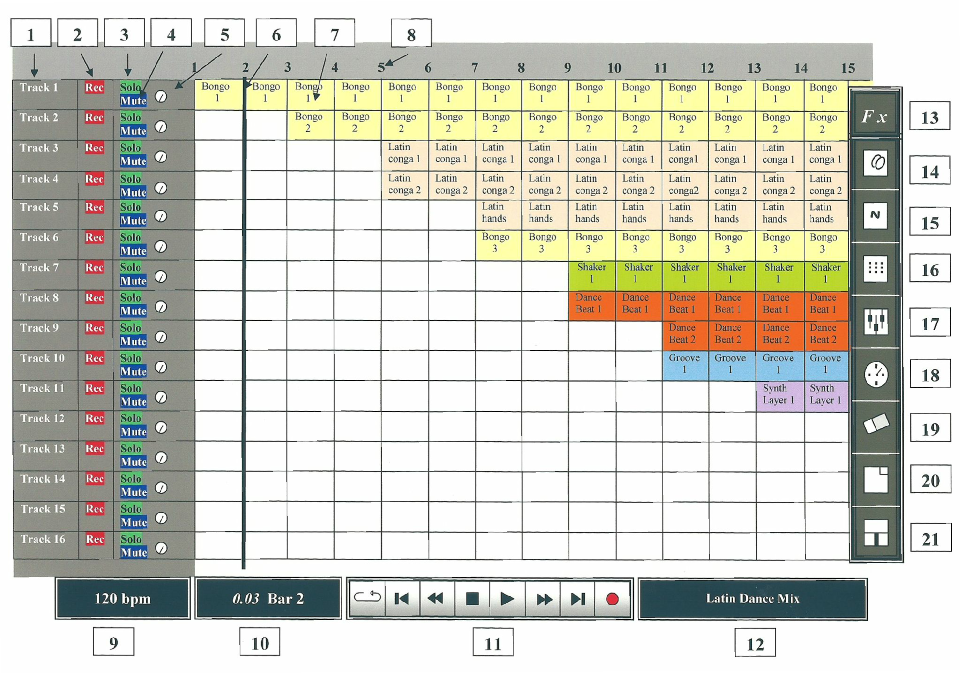

These are the basic functions you are likely to encounter regardless of which sequencer you use. Remember also that simply pointing the computer mouse cursor directly on any icon of your sequencer will activate a pop-
Sequencer Functions

Track
|
|
1
Individual track Indicator
There are lots of individually numbered tracks onto which you can record music or paste pre-


Rec
|
|
2
Individual track Recording Button
This button will enable you to record live music onto a track, or record a multi-

Solo
|
|
3
Individual track Solo Button
Clicking on this button ensures that only the music on the selected track will be heard during playback of a multi-

Mute
|
|
4
Individual track Mute Button
Clicking this silences the selected track -
|
|
5
Individual track Pan Button
This control allows you to ‘pan’ (move) the music of a track between different speakers (left and right). When the dial is pointing upwards in the centre the music is perfectly balanced between the two. Moving or ‘panning’ the dial to the left causes the music to sound more (or only) from the left speaker, and panning right causes it to sound more (or only) from the right speaker. Asigning tracks to different speakers can create interesting spacial effects, giving the music a more '3-
|
|
6
Playback progress Line
This line moves from left to right as the music plays, showing the exact progress point in the music; e.g. which sound loops are playing in which bar at that moment.

|
|
7
Musical Sound Samples or ‘Loops’ (or Sequences)
Sound samples or 'loops' are normally shown on screen as coloured rectangular shapes, often displaying the name of the chosen sound -
Each coloured rectangle or strip represents a musical event that has been produced using one of the following methods:
1. By dragging-
2. Recorded live on a musical instrument (or voice) through a microphone (or via a MIDI cable or USB audio interface) connected to the computer. Most sequencers have this facility, enabling you to record and edit live music then combine it with the sequencer's sound samples.
3. Recorded using a MIDI keyboard connected to the computer. Many sequencers allow you to enter/record notes played in real time on a MIDI keyboard -
4. By adding notes one at a time onto a blank music stave on the computer screen using a mouse or computer keyboard. The composer can then select a particular instrument sound to play the newly created music, perhaps choosing from the standard set of 127 MIDI sounds – which includes grand piano, organ, flute, guitar, banjo, violin, string ensemble, synthesizer pads, bass guitar, cello, double bass and a full range of drum kit samples. Programmes which allow a piece of music to be developed in this way, using standard music notation, include Sibelius and Cakewalk.
|
|
Bongo
1
|
|
Bongo
1
To put together the dance track for this workshop I used a sequencer called e-

|
|
8
Bar (or Measure) Numbers
1 2 3 4 5
These are sometimes highlighted when the Playback Progress Line reaches them so that you can see exactly which bar is currently playing.
|
|
9
This displays the precise musical tempo of a track in beats per minute (bpm). For example, 120 bpm indicates that the track speed is 120 beats per minute. The tempo can of course be altered, normally by clicking on the Tempo Indicator and entering a numerical value (e.g. 80, 100, 120 etc.) or by moving a slider control up or down.
|
|
10
Track Duration and Bar/Measure Display
This shows the time (in minutes and seconds) and bars/measures as they elapse with the track's progress.
|
|
11
Playback Control Panel
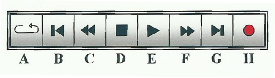
The functions of PLAY, STOP, FAST FORWARD, FAST BACKWARD, SKIP FORWARD, SKIP BACKWARD and RECORD are universal symbols that look the same on electronic equipment such as stereo systems, CD, DVD, MP3 and Blue Ray players.
A. LOOP Click on this button to make a section of music or a sound sample repeat continuously until you click it again
B. SKIP BACK Click this to jump back to the start of the track
C. FAST BACKWARD This will allow you to speed backwards through a track to search quickly for a particular point in the music. Normally this is done by clicking and holding the button, or sometimes just by clicking it once
D. STOP This button will stop the track playing
E. PLAY This button will start the track playing, either from the beginning or from the point at which you stopped previously
F. FAST FORWARD This will allow you to speed forwards through a track to search quickly for a particular point in the music. Normally this is done by clicking and holding the button, or sometimes just by clicking it once
G. SKIP FORWARD Click on this to jump to the end of the track
H. RECORD Click to record a 'live' instrument or voice, or to record on a single track a section of multi-
|
|
12
Track Title
The title of your piece can be typed and saved (and changed at any time) to appear in the Track Title bar. This title should then also appear in the 'track information' of a burned CD or a Media Player device that plays your final saved track.
|
|
13
Effects Studio
This will access a sound equaliser that allows you to increase or reduce the treble and bass frequencies in a track, as well as add effects such as delay, reverb, chorus and overdrive (distortion) etc. to an individual track or an entire piece. Other functions are likely to include fade in, fade out, cross fade, track volume control, transpose and sample trim. This is a great tool not only for mixing a final track but also for creating some of your own original sounds -
|
|
14
A groove is a rhythm or beat that fits with a particular style of music, for example a blues groove or swing groove. A groove generator can create new rhythm patterns and beats (‘grooves’) by editing the existing rhythms of samples taken from the sequencer's sound bank (or music you have created yourself) to suit the style you are composing in. The groove generator normally also has equalizer and transpose functions together with a volume control, and will allow you to add effects such as overdrive (or distortion), echo, reverb, and chorus.
|
|
15
Booster
This is a kind of equaliser that edits sound frequencies or signals in specific ways, (for example using compression, drive, attack and release controls, speed and gain slider controls and stereowide slider controls), allowing numerous sound variations to be applied to music samples or recordings. For example, this function can be used to boost the bass frequency of a sample so that it sounds deeper and more resonant.
|
|
16
Drum Matrix
This is for creating drum tracks based on sound samples taken from the standard drum kit, including toms, bass drum, snare drum and hi-
|
|
17
Mixing Desk
A virtual mixing desk that resembles and functions the same as that used in a recording studio. With solo, mute, pan and slider volume controls for each track.
|
|
18
Adjust Sample Tempo
This function adjusts the speed/tempo of an individual sound sample, normally by means of entering a numerical bpm value (e.g 100 bpm = 100 beats per minute). It usually also has a metronome so that a beat can be heard in order to assist in tempo selection.
|
|
19
Eraser Tool
This is used for erasing sections of a sample or track. (Sometimes the icon for this tool is a pair of scissors indicating that it can 'cut' sections)
|
|
20
Begin New File/Mix
Opens a blank sequencer file to allow you to begin a new piece of music or 'mix'
|
|
21
Load/Save
This saves your work and might also (on some sequencers) be used to import audio files, load previously saved music, and save and export your final mix -
Piano roll view (or Matrix edit mode)
Although not shown on the diagram above, this feature is present in many sequencers. Piano roll is a graphic way of representing music using a grid on which the pitch and duration (or rhythm) of musical notes are represented as rectangles corresponding to the keys on a piano keyboard. This graphic method of editing music can be accessed either by clicking on the piano roll icon or double clicking on a sound sample itself.
The diagram below shows a piano roll view of a passage of notes from a violin sound sample in 4/4 time. The vertical lines on the grid create cells which represent the main beats in the music, (in this case crotchet (quarter note) beats), with every bar shown as a more prominent vertical line. The horizontal lines correspond to individual notes on the piano keyboard on the left. Notes are displayed as dark rectangles or squares.
The first rectangle appears on beat 1 in line with middle C (C2) on the virtual keyboard on the left, and the next on beat 2 in line with the note E, with the notes G and E following on beats 3 and 4 respectively. Each rectangle occupies a whole cell and is therefore a full crotchet beat, so in bar 1 we have the notes C, E, G and E played in crotchet beats.
The following four notes in bar 2 (F, G, A, B) each occupy only half a cell and are therefore quavers (eighth notes). The next note, C, is a crotchet on beat 3. There are no notes (or rectangles) on beat 4 so this a crotchet rest.
Below shows the same passage of music in standard music notation; compare it to the piano roll view to make sure you understand how one compares to the other!
In piano roll view, clicking and dragging a note (rectangle) up or down will alter its pitch; dragging it right or left will move it to another beat in the bar; and double clicking on it will cause tabs to appear on the note which when dragged right or left will either lengthen or shorten the note value. So, for example, a note which was originally a crotchet can be shortened to a quaver or semiquaver, or lengthened to a dotted crotchet, minim, semibreve etc.
With such scope for editing the notes, a composer can completely transform a pre-
Piano roll view can seem a bit strange at first but once you get used to reading the grid it all becomes easy!


‘As with most kinds of learning, the best approach for getting to know a sequencer is to do things step-
With all musical compositions it’s usually helpful to start off with a basic plan, which can include the style, structure, musical instruments/samples and other concepts you might use. I began my dance track by considering the main stylistic elements of the piece, then sketched a basic diagram of a possible structure.
Style Elements
I wanted to combine some Latin-
Percussion instruments such as bongo drums, güiro and shakers are used in Latin-
In dance music, the track quite often begins with just a single sound or two, to which new sounds are added one by one to build up the texture -
With these elements in mind, I mapped out a diagram of a possible structure.
Basic Structure Diagram
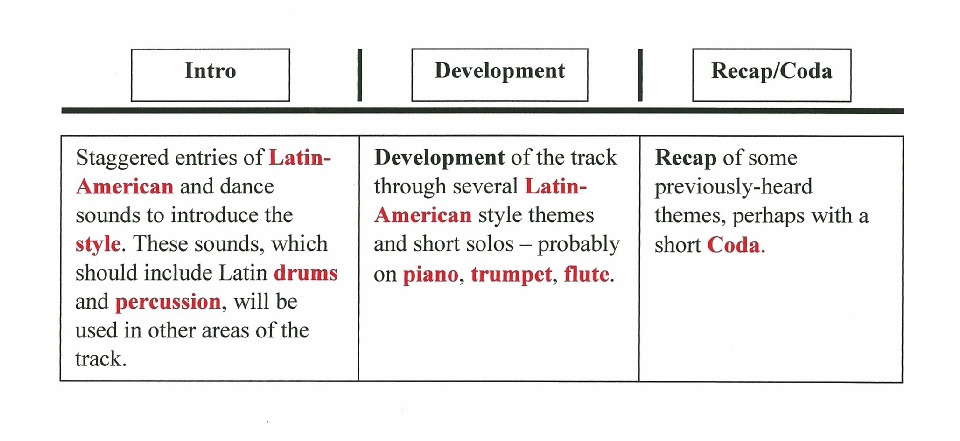
Structures are not normally complex in dance music; the most important elements are beat/pulse, repetition, tempo and of course the sounds/samples used. So my planned structure comprised just three main sections: an opening Intro, a middle Development section and a closing Recap with a possible Coda.

Now I just had to choose suitable samples from several hundred in the sequencer's bank of sounds or 'sound pool.'

‘Dance tracks are often called ‘mixes’ because a piece of music is created by mixing (and editing) a number of pre-

Start by Just Listening
When you first start using a sequencer it’s a good idea to have some fun just listening to the sound samples that are stored in the sound bank or sound pool. There can be anything from 127 to several hundred of these, depending on the sequencer, and you can normally expect to see them listed in categories such as strings, brass, synth pads, layers, drums etc. Some have a drop-
You can spend loads of time listening to the sound samples, and even more time experimenting with them(by combining, editing and looping them) to create new sounds.
For my dance track I was of course focussing on samples with a Latin-
Virtual Tablet
Listen to the 6 sound samples I selected from dozens of drum and percussion sounds in the sequencer's sound bank. They are: 4 Bongo drum samples followed by 2 Latin percussion effects.
Excerpt 1 (begins at 0.11): 6 sound samples. Category: Drums and Percussion.
Virtual Tablet
I chose these 7 sound samples for their strong rhythmic dance pulse.
Excerpt 2 (begins at 0.41): 7 sound samples. Category: Dance beats or ‘grooves.’
Virtual Tablet

Both of these samples are classic dance track sounds that may be familiar to you. They have a sustained sound that will stand out as a melody and also add depth to the track.
Excerpt 3 (begins at 1.21): 2 sound samples. Category: Synthesizer ‘layers.’
Virtual Tablet
4 trumpet samples and 2 piano samples
Now for the stylistic solo instrument sounds. Here I selected samples taken from two of the most commonly used solo instruments in Latin-
Excerpt 4 (begins at 1.41): 6 sound samples. Category: Trumpet and piano solo melody instruments
Virtual Tablet
These resonant bass beats would really add extra depth to my track
Excerpt 5 (begins at 2.07): 4 sound samples. Category: Bass dance beats
Virtual Tablet
Now for the human touch! These 8 samples, ideal for my Latin-
1. 'The rhythm takes you...' 2. 'Ritmo Latino...' 3. 'Let yourself go...' 4. 'Mira como bailan la gente, mira como bailan.' (look at how the peope dance, look at how they dance.) 5. 'Come on now...' 6. 'La salsa...' 7. 'Everybody...' 8. 'Baila conmigo' (dance with me)
Excerpt 6 (begins at 2.27): 8 sound samples. Category: Vocals

Intro (0.01 -
I decided to begin my track with bongo drums as their sound immediately suggests a Latin-
To create the loop all I had to do was select the bongo 1 sample from the sequencer's sound bank then copy and paste it onto track 1 as many times as I wanted in order to produce a seamless and repetitive bongo drum part. (The same looping task can normally also be carried out by clicking-
Virtual Tablet
Listen to my first sound loop which I laid down on track 1. This is a constant repetition of the first 3 second bongo drum sample heard in excerpt 1 above.
Loop 1 (begins at 2.56): Looped bongo drum sample

This loop would form a drum ‘backing’ over which I would progressively add other sounds at staggered intervals to create the intro outlined in my basic structure plan. I decided to continue by adding more percussion samples, overlapping them in a way that would suggest several drummers/percussionists playing in an ensemble.
Virtual Tablet

Listen to how I successively added more percussion samples after the first bongo 1 loop to develop the texture. The new loops enter at two bar intervals, creating a gradual build up of overlapping sounds in the first 15 seconds of my piece (for a visual representation see the sequencer diagram above). In this opening section I produced a kind of 3-
Loop 2 (begins at 3.09): 4 Latin percussion samples, looped and overlapped
With seven percussion tracks creating a nice rhythmic opening I now turned my attention to the other sound samples I selected earlier. This seemed the perfect time to inject the dance element into my intro, and so I opted to use three kinds of bass dance beat samples (Dance beat 1, Dance beat 2 and Groove 1), creating loops from each (bars 9 and 11 in the sequencer diagram above). Immediately after this, at bar 13, I introduced melody into the texture for the first time by adding a synth layer (see sequencer diagram above).
By the time I had constructed a short phrase with the synth layer, 30 seconds of my track were already completed.
Virtual Tablet

The overlapping structure of the music so far was created as follows (see also the sequencer diagram above):
From the start of track: Bongo drums and percussion.
From 15 seconds: Bass dance beat samples and shaker.
From 19 seconds: Dance groove.
From 22 seconds: Synth layer.
Loops combined (begins at 3.25): First 15 bars (30 seconds) of ‘Latin Dance’

So far I had achieved what I'd set out to in my structure plan, which was to create an intro by gradually introducing the stylistic Latin samples that would be central to the track. Notice how the staggered entry of each sound steadily builds up the momentum of the music?
I still hadn't introduced my main solo instruments (trumpet and piano) or any vocals yet, so that would be the next step.
I intended to have a lively section based on a 'conversation' between trumpet and piano, but first I wanted to introduce both of these instruments and so lead smoothly into this development section. So I constructed a melodic phrase from two trumpet samples (with a single bar rest in between) and put this into my 'mix' at 0.30. Then at 0.34 I inserted a classic accelerating electronic drum fill sample (common in dance music and very effective in linking sections) overlapped by a vocal line ('The rhythm takes you') at 0.36 which linked nicely to the first piano sample at 0.37.
Transition from Intro to Development (0.37 -
All the main samples had now been introduced, meaning I had reached a transition point in the music that would lead to my development section. For this transition, I simply repeated the piano sample used at 0.37-
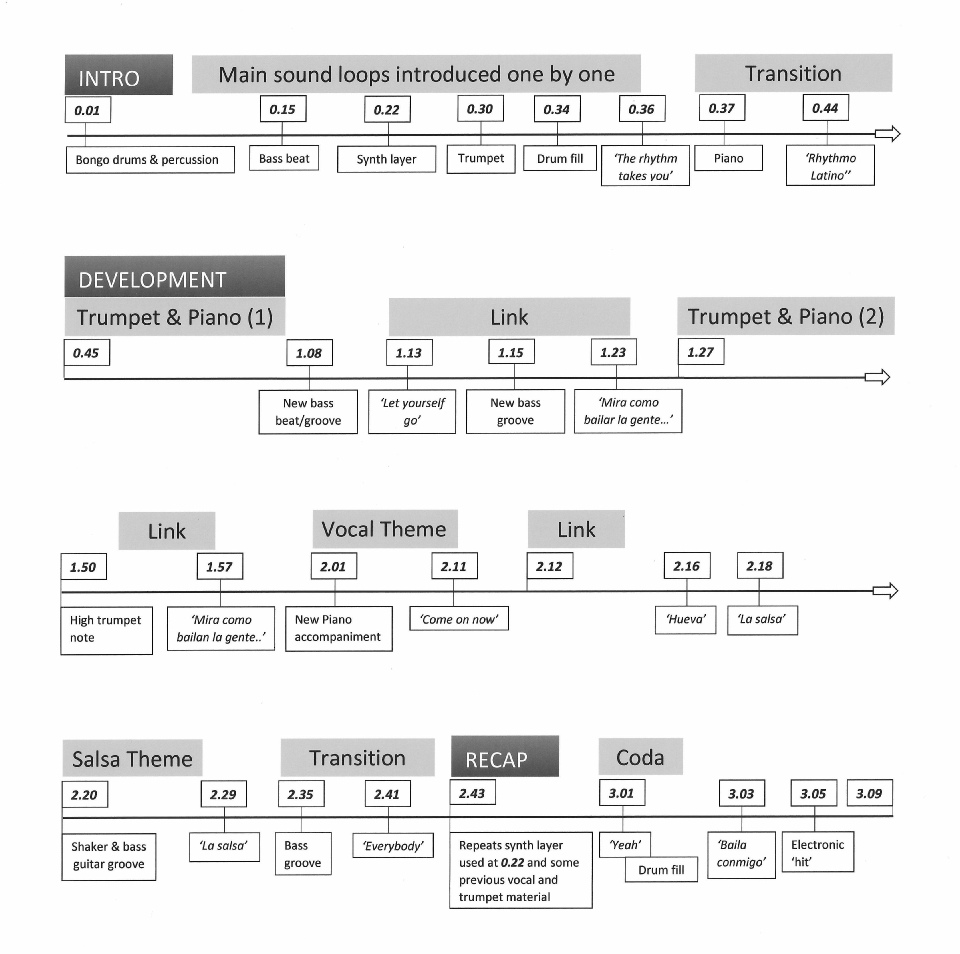
From this point, as you read through the composing analysis of the remainder of 'Latin Dance' you should refer frequently to the structure diagram of the completed track (below) and the final audio track (YouTube; click here) or track 35 on the accompanying CD of How to Pass National 5 Music).

'Latin Dance' was going to have many samples and loops that would create various 'layers' of sound, each assigned to a separate track of the sequencer, but its basic texture would be as follows:
Top: (solo melodies); trumpet, piano and vocals
Middle: synth layers, bongo drums and percussion
Bottom: bass dance beats and grooves
Development section (0.45 -
Having a basic structure plan along with a number of pre-
Trumpet & Piano (0.45 -
I had now reached the point in 'Latin Dance' (0.45) where the sounds heard in the intro would be developed into more substantial musical melodies. Trumpet and piano were going to be the predominant instruments, with some vocals appearing now and again. So, to begin, I worked patiently on selecting and piecing together several short trumpet samples to create a longer trumpet solo melody. As this grew I hit on the idea that it would be good to have two trumpet tracks forming a kind of question and answer duet. This sounded very good, but it was obvious on playback that the trumpet duet would not be effective on its own, even with the accompanying percussion; it would have to be supported by another sound. The obvious choice here was of course piano, which was my other solo instrument sound anyway.
After some more patient experimentation with piano samples, I linked several of these together to create a nice solo piano track that worked alongside the trumpet duet. Again, this was achieved by constantly playing back and listening carefully to passages of music, experimenting with new material or removing certain samples until I had something I was happy with. (Throughout this process of piecing together the solo instrument samples it was very helpful to activate the sequencer's LOOP function to constantly repeat the percussion backing tracks in a loop, allowing me to hear which solo sounds worked well with rest of the music without having to keep stopping and restarting the track at a specific point.
I became so engrossed in this enjoyable task, however, that I got a bit carried away and ended up with a trumpet and piano section that was just a bit too long when heard in its entirety. I considered cutting something, but all of it sounded so good that I just couldn't decide which part to cut! The sensible solution therefore seemed to be to split the trumpet and piano section into two parts, each separated by a link and perhaps some vocal samples.
The resulting music lasts from 0.45 -
Vocal Theme (2.01 -
Until now I had only used a few isolated vocal samples and I got to thinking that it would be good to have a small section where vocals were the main feature. So once again I became engaged in experimenting with samples (this time Latin style vocals), slowly piecing together some phrases. This turned out to be quite challenging as few of the samples sounded convincing when joined together, so in the end I settled for a kind of vocal duet with samples overlapping each other in a lively, spontaneous sounding way. (This part lasts from 2.01 -
Salsa Theme (2.20 -
It was at this point whilst experimenting with some new samples that I stumbled upon a few (which included shaker, wood block, cow bells, maracas and another bass groove) that reminded me of salsa music, and I liked them so much that I decided to compose a little salsa section. This would also be the perfect opportunity to use the vocal sample 'La salsa' which I selected at the start. (The salsa theme occurs from 2.20 -
When this was completed I just needed link passages to make seamless joins between the end of the trumpet & piano (2) section and the start of the vocal theme, and then between the end of the vocal theme and the start of the newly composed salsa theme. For the first link (1.53 -
The music now lasted two minutes and thirty-
Recap (2.43 -
To begin with, I cut and pasted the synth layer sample first heard at 0.23 and added some new, similar layers onto the end of it to extend the section and also create variation. I then overlayed (or *overdubbed) these with some previously used vocals (and a couple of new ones) and fragments of trumpet melody in order to strengthen the effect that this was a Recap of themes heard earlier. (The Recap lasts from 2.43 -
The music was now of course leading to its conclusion, which would involve a short Coda.
Coda (3.01 -
One of the first samples I selected for the Coda was another accelerating electronic drum fill (similar to that used at 0.34) since this kind of sound works well as a link to new sections. I then overdubbed this with two previously used vocal samples followed by an 'electronic hit' sample carefully placed to coincide with the end of the drum fill, ending the music in an abrupt, single beat of sound.
With Recap and Coda complete, my final task was to create a convincing transition section to smoothly join the end of the salsa theme with the Recap.
Transition between Salsa theme and Coda (2.35 -
I needed something that was a little different, but not so much that its sudden appearance would sound out of place or just 'dropped' into the mix.
The solution I eventually came up with was to re-
My dance track was almost finished. I say 'almost' because I now had to listen to it several times straight through from start to finish to hear if it all joined together smoothly with no obvious weak areas. (Such weak areas sometimes arise as a result of focusing on one section of music at a time without frequently returning to the start of the developing piece to hear how everything is working together as a whole). But at this stage it is also normal to experiment by adding effects such as delay, chorus, reverb etc. to the piece (or just sections of it) to find out if doing so gives better results. This process is known as 'mixing down' a track and is an important part of composing with a sequencer before declaring any piece of music finished. Even just adding musical dynamics (altering the volume levels in particular places) can produce effective results.
Virtual Tablet
Listen to ‘Latin Dance’ in its entirety now on YouTube or CD track 35 as you follow the structure diagram below showing the main structural landmarks.
‘Latin Dance.’ Complete track

Using a sequencer is an exciting way to compose music as you have a whole army of high quality sounds at your fingertips. You can be composer, conductor, performer and producer -
‘Most modern pop music is produced with the aid of sequencers, often with the lead singer(s) recording his/her/their voice(s) over a pre-
Tempo Indicator
Groove Generator
The Composing Plan

Choosing the Sound Samples
Getting Started on the Track
Adding More Sound Layers
Developing the Track
Structure of the Completed Dance Track

Home | About | News | National 5 Music | Higher Music | Shop
Resources | Charity | Contact | Tuition | Links
Copyright © Joe McGowan 2016
Notice how short all of these sound samples are. That’s because most are intended to be repeated as loops. You can hear the effect of looping in the musical excerpts in the next section.


‘Sequencers can be a shortcut to making great sounding music. However, more creative composers don't use them exclusively to make their music, and will include natural musical instruments and/or vocals in a piece.
When combined with real instruments, the wonderful technology of sequencers can help to create some truly amazing and original music. Below are some composers who employ this combination successfully; check out their music for a little inspiration.’
* James Horner (film music composer)
* Mike Oldfield
* Enigma (group)
* Brian Eno
* Jean Michel Jarre
National 5 Music
Composing a Dance Track


C


